How to connect your phone using a Cisco ATA
Posted on 12 October 2026 by Beaming SupportMoving to a digital phone service changes where your telephone connects. Your analogue phone connects to a small adaptor, called an ATA, which connects to your broadband router.
Beaming configures your Cisco ATA 191 before sending it to you. Your telephone number or numbers are already programmed, so you only need to connect the equipment.
What you need
- Your preconfigured Cisco ATA 191 and its power supply.
- Your analogue telephone, or the base station for a cordless phone.
- The supplied RJ11-to-BT adaptor, already fitted to the ATA, so you can connect your telephone’s BT plug.
- An Ethernet cable to connect the ATA to your router.
- A working broadband connection and a spare LAN port on your router.
For a second telephone, Beaming configures a second ATA phone port and supplies an additional adaptor lead.
Connecting the ATA: step-by-step guide
1. Keep your broadband connected
Leave the router’s broadband cable connected to your existing broadband wall socket. Keep the router powered and check you can get online.
It is the telephone connection that moves to the ATA. The router’s broadband connection stays in place.
2. Connect the ATA to your router
Connect one end of an Ethernet cable to the port labelled NETWORK on the Cisco ATA 191. Connect the other end to a spare yellow LAN port on the TP-Link TD-W9970, such as LAN1.
The router’s DSL port is for its broadband connection. Use a LAN port for the ATA.
3. Connect your telephone
Unplug your telephone’s BT plug from the Openreach telephone wall socket, or from the telephone side of your filter. Plug it into the BT socket on the pre-fitted white adaptor lead, which is already connected to PHONE 1 on the ATA.
Keep your existing telephone lead connected to the phone. Leave the fitted adaptor connected to the ATA.
For a cordless phone, use the base station’s telephone lead rather than the handset, and keep the base station’s power supply connected.
If your telephone plug does not fit the supplied adaptor, contact Beaming for help choosing the correct connection.
If you have a second telephone
If Beaming has configured PHONE 2, plug your second telephone into the adaptor supplied for that port. Each phone uses the number configured for its ATA port. Check with Beaming if you are unsure which number belongs to each port.
4. Connect the ATA power supply
Connect the power supply provided with the ATA to its DC 5V POWER socket and a mains socket. Allow the ATA to start and connect to the service.
You do not need to enter your telephone number or change the ATA’s settings.
5. Test incoming and outgoing calls
Make an outgoing call, then call your telephone number from another phone to check it rings. If both ATA ports are configured, test each telephone number.
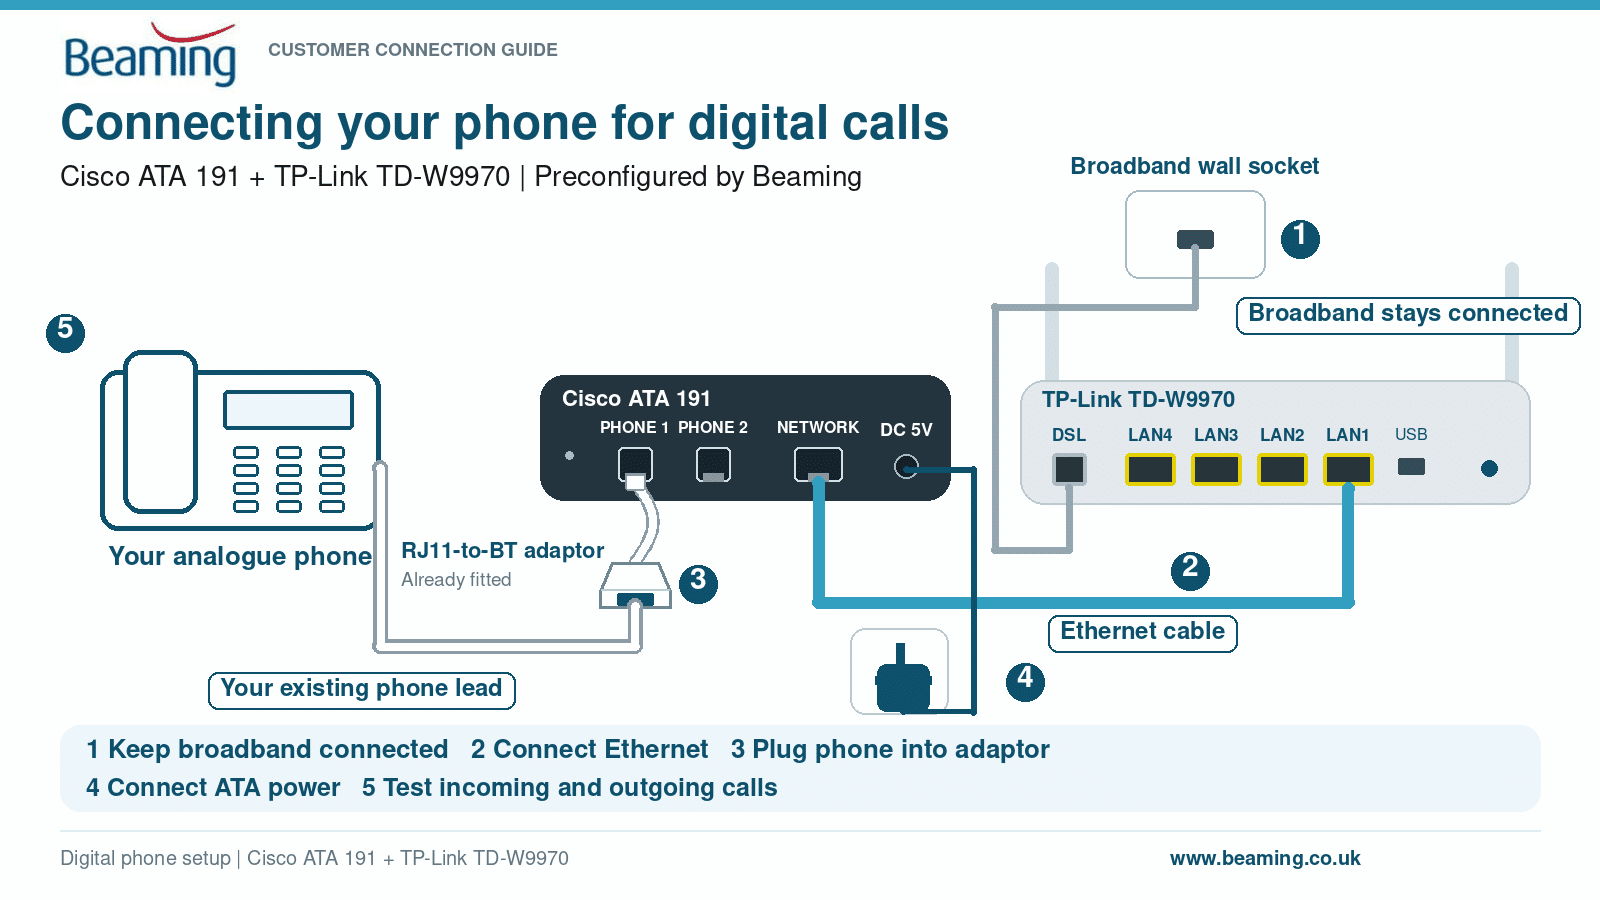
Your connections at a glance
Your analogue telephone connects to the white adaptor fitted to PHONE 1 on the Cisco ATA 191. The ATA’s NETWORK port connects to a LAN port on your router using Ethernet. The router’s broadband cable remains connected to the wall socket, and the ATA connects to its power supply.
Need a hand?
If calls are not working, check that another device can get online, then check the ATA’s power, Ethernet and telephone connections. Contact Beaming for help before resetting the ATA, as a factory reset can remove its configured settings.