Configuring GRE Tunnels on a Cisco router
Posted on 22 August 2018 by Beaming SupportGeneric routing encapsulation – also known as GRE – has a wide range of benefits. For example, one of the main benefits is that it is able to accommodate any transport protocol (IPv4 or IPv6). It is also extremely easy to configure. See below for an example of configuring GRE tunnels, with a network diagram for clarity.
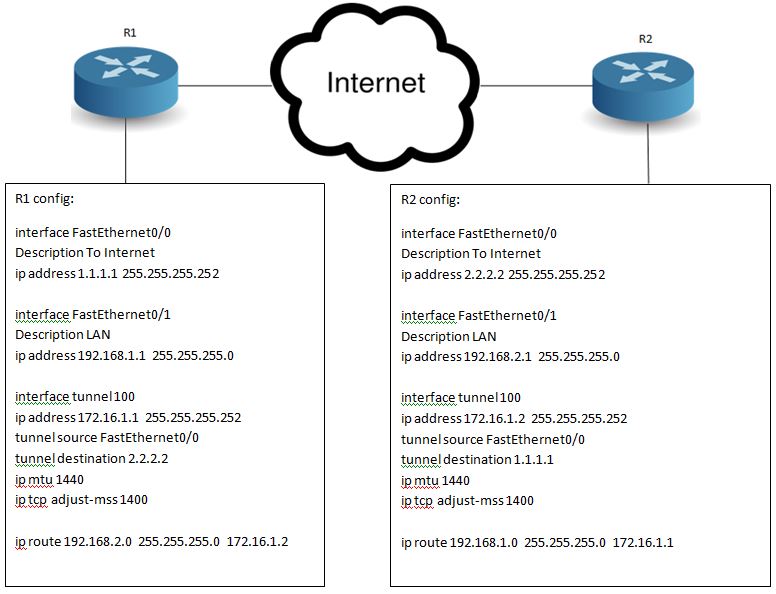
When we issue the Interface tunnel command, we create a logical interface on the router and name it appropriately. Please be aware the tunnel numbers do not have to match; for example on R2 it could be Tunnel 101 instead of 100. But we would advise using the same numbering for easy manageability.
The “tunnel source” command allows you to specify what interface you want the GRE tunnel to be initiated from, for example we chose our internet facing interface which is FastEthernet 0/0.
Lastly, the tunnel destination command is quite self explanatory, but it’s the address we want to terminate the tunnel on, so for us it was the IP address of R2 internet facing IP address of 2.2.2.2 from R1 perspective. Please also see the MTU and TCP ADJUST-MSS commands we have added to the Tunnel interfaces to take into consideration the TCP/GRE overheads.
Now all we have to do is add routes so that the LANs can talk to each, this can be seen at the bottom of the R1 and R2 config panes.
Next step
Secure your GRE tunnels using IPSec