How to set up a basic Azure IPSec VPN Gateway
Posted on 28 January 2019 by Beaming SupportThis guide assumes that you are creating a site to site VPN and have set up a subscription & virtual network (if a virtual network is not already set up, make sure to use an address space of at least a /16, as you will need to create a gateway on a /27 later on).
Gateway Subnet
- Within the Azure Dashboard, choose All Services, Virtual Networks, then select your /16 Virtual Network.
- Select Subnets, then ‘+ gateway Subnet’.
- Specify a /27 network that is within your address space, but not overlapping with a subnet in use. For example, set up an address space of 10.1.0.0/16, with a server address of 10.1.0.0/24 and a GatewaySubnet address of 10.1.1.0/27.
Create Virtual Network Gateway
- Within the Azure Dashboard, choose All Services, then select Virtual Network Gateway.
- Choose ‘Add’ to bring up the following screen.
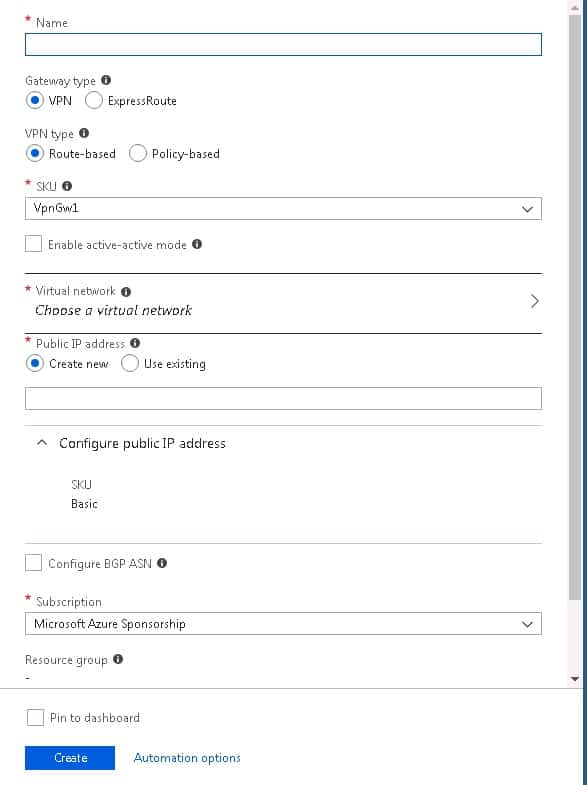
- Give your Gateway a name, then select VPN and VPN type as Route-based.
- Your SKU will determine your costs, so make sure to hover over the assistance icon and choose ‘Learn more’ to decide which is right for you.
- Choose the Virtual Network you created earlier, specify whether or not you need a new Public IP address and select your subscription. Click Create when you are happy with the choices.
Configure Virtual Network Gateway
- Once again, go to All Services and select Virtual Network Gateways.
- Choose Connections, then + Add. Choose a name and set the connection type as Site-to-Site(IP-Sec). If not already selected, make sure to set your Virtual Network Gateway as the one we just set up.
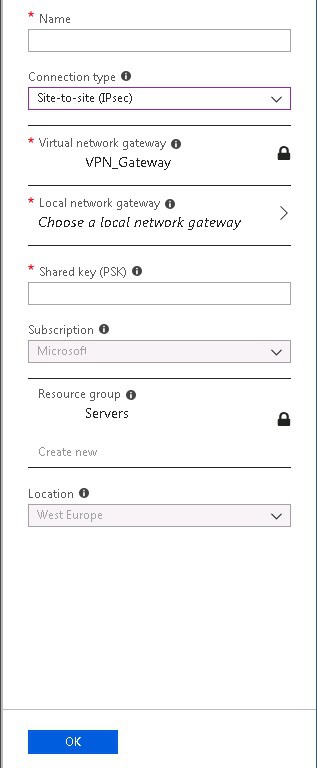
- Now select Local Network Gateway and Create New. This is where we define the network for your on-premise setup.
- Give it a name, add the Public address of the site and then the LAN address space for the on- premise site.
- Once that has been set up and chosen, type your Pre-shared Key for the IPSec VPN, choose a subscription, a resource group and Click OK.
- Once this has completed, go to Virtual Network Gateways > your gateway > Connections and choose the connection we just made.
- At the top of this page, select Download Configuration and choose the router/firewall that you have on site. The page will then give you the exact script for using on your own device in order to bring the connection up.
- Simply complete the VPN config from your on site device and wait for the VPN to come up.
Once the VPN is established and you have added the necessary routes to your on premise device, you will have two way private communication. We suggest going in to your Network Security Group and locking down access to the external IP of your site, unless the Azure server is used for RDP or remote access.
One last point to touch upon is that Microsoft charge for any data that leaves the Azure platform. If you plan to use the Azure server as a backup, then the costs will be minimal, but if this is for production, then be aware that after the 5GB of free data, costs will be incurred. This is something to consider when creating a server on the Azure platform.
Avoid internet downtime
IT professionals in UK businesses dealt with 82M hours of internet outages last year.