Copy emails sent from a group mailbox back to the inbox
Posted on 28 February 2019 by Beaming SupportThis is our step-by-step guide to help you set up a rule on your Office 365 admin centre so that any emails you send from a particular group or mailbox will be automatically copied into the appropriate inbox.
This can be very useful for a company if you have a distribution group set up and you want to be able to see who has replied to an email. This way everyone will get a copy of the reply and be able to file the email accordingly.
How do I implement this?
By following a few simple steps as per the below.
- Log in to your office 365 admin portal and click on “Admin Centres” in the bottom left-hand corner, this should load up a selection of options.
- Click on “Exchange” This will open up an entirely new tab on your browser, you will then need to click on the tab called “Mail Flow” on the left-hand column of the screen. Once selected you will be presented with the following options.

- You will now need to select the “+” button shown in the left-hand side of the previous screenshot and then select “Create a new rule”. You will see the following screen.
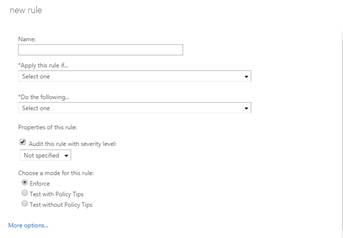
- Input an appropriate name for the rule and then select the drop down box for “Apply this rule if” and select “The sender is…”. This will present you with a full list of all of the email addresses for the company. You will need to select the name of the email address that should receive a copy of its own emails. Once selected, ensure that the display name is in the “Add ->” box (as per the below screenshot) and then click “OK”.
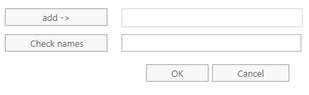
5. The next step will be to select the “Do the following…” box and then select “Bcc the message to…” and then locate the same mailbox as the previous step and then ensure the display name is in the “Add ->” field and then click OK.
6. You will now need to select a severity level, this can be of the lowest level without any issue. Once this has been selected you will need to click “Save” and then the rule will be implemented on the system and can be tested as working right away.
Found this useful?
We put a spotlight on our best how-to guides in our monthly email bulletin, as well as including business tips and cyber security advice for SMEs.