How to configure a static internal IP address on a Windows PC
Posted on 5 April 2019 by Beaming SupportIn this article, we will show you how to quickly change your internal IP address from an automatically allocated address (allocated by DHCP on your local router) to a statically set IP address.
Please not that this article refers to internal static IP addresses only.
Being able to use a statically set internal IP address may be beneficial if you are running specific services on your PC that require the IP address to remain the same. This can include file sharing in a local network, as you will need to map the drive and in order to do this the best practice would be to have a static IP on the “file sharing” PC. This is very useful in enterprise environments.
Please note that you will need administrative access to the computer in order to make this change.
Step 1) Press the Windows Key and the letter “R”. This will display the “Run” command box.
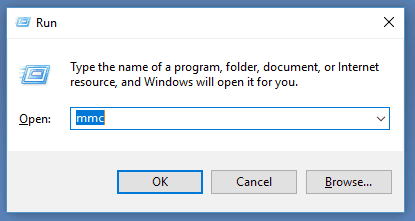
Step 2) Enter the command “ncpa.cpl” and then click the “OK” button.
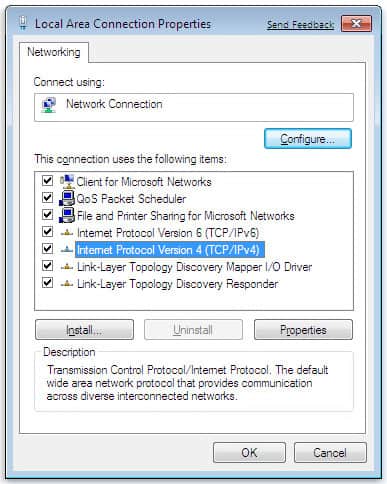
Step 3) You will then be presented with the “network connections” area as per the below.

Step 4) Double click on the option that is relevant for you, if you only use WiFi then double click “WiFi”, if you use an Ethernet cable to connect to your router then you will need to double click “Ethernet” (this may also have “local area connection” as an option which is another term for the “Ethernet” option).
Step 5) This will then bring up the “Status” screen. Click “Properties” (This is the stage for which administrative access is required).
Step 6) Double Click on “Internet Protocol Version 4” as per the below.
Step 7) You will then get this prompt. “You can get IP settings assigned automatically if your network supports this capability. Otherwise, you need to ask your administrator for the appropriate IP settings.”
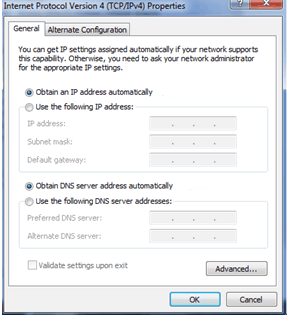
You will need to select “Use the following IP Address” and put in the static details you would like. It’s important that all three of the first boxes (IP Address, Subnet mask and default gateway) are filled in otherwise you won’t be able to access the network properly. You will also need to fill in at least the top box of the “DNS” area in order to have a proper connection and be able to resolve domain names.
Step 8) Press OK to all of the boxes and restart the PC, once complete, the static IP will be in place.
Found this useful?
Our team share their how-tos, trouble shooting guides and tips for getting the best from your business connectivity in a monthly email round up.